
Wallet Abstraction: Google OAuth x Lit PKP
Follow this guide to understand a proof of concept on how to mint a Programmable Key Pair and execute an on-chain transaction with only a Google account.

The ability to authenticate an account through OAuth and have a web3 wallet abstracted away, will revolutionize the way we interact with decentralized applications and services. With the increasing adoption of blockchain technology, this way of authentication will make it easier than ever for users to access decentralized services and products.
By providing users with a web3 wallet that is connected to their existing web2 accounts, users can enjoy a seamless onboarding experience while managing their web3 digital assets. Furthermore, the wallet abstraction allows users to manage their wallet without the need to store any pass phrases. The combination of OAuth and web3 wallet abstraction is a powerful tool that will revolutionize the way we interact with decentralized services and products. By reducing the complexity of onboarding and wallet management, users have the ability to access these services without having to worry about the complexities of blockchain technology. This will open up a world of possibilities to users who are looking to take advantage of the decentralized economy and help to increase the adoption of blockchain technology as users become more comfortable with the idea of managing digital assets.
How is this possible with Lit?
Programmable Key Pairs (PKPs) are public/private key pairs generated by the Lit network in a process called Distributed Key Generation. Each node custodies a share of the underlying private/public key, meaning the key never exists in its entirety. Users can mint a PKP in the form of an ERC-721 NFT. There are multiple ways someone can sign with a PKP through setting a Lit Actions authorization method. For example, Google OAuth becomes the method of authorization for the Lit nodes. This proof of concept will demonstrate how that works.
The following codebase goes through an example use case of Lit’s OAuth service to authenticate a user with a Google account and complete storing an encryption condition on the Lit nodes - all without a single passphrase or web3 wallet in sight.
GitHub: OAuth PKP Signup Example
Notes: The relay server used in this example is not public, please follow the example as a proof of concept of what is possible with Programmable Key Pairs. If you’d like learn more read the docs and join the Discord!
This project utilizes the new session keys feature the Lit team is currently working on. Read more about wallet signatures and session keys in the docs.
Project Overview
- Uses Google OAuth to authenticate the user.
- Mints a Programmable Key Pair (PKP) token for the user, with their Google account as a valid authentication method.
- Uses the PKP token to get an Ethereum address for the user.
- Generates a local session key for the user and stores it in LocalStorage.
- Uses the Lit Protocol's PKP Session Signing service (Lit Relay) to sign that session key with their PKP.
- Uses the local session key to sign a request to encrypt and decrypt a string that only the user can decrypt.
Create PKP through Google OAuth
Use a Google account to mint a PKP then use the PKP to sign a request to encrypt information using the Lit nodes. Gas free. No need to have a web3 wallet, just a Google account!
What is the purpose of the Lit Relay?
The Lit Relay is a relayer server that take care of the PKP minting request, tying together the PKP and the Google account, and helps make transactions all in a gasless (fee-less) manner to the end user. The costs to mint a PKP and to create an on-chain transaction are subsidized by Lit Protocol for the time being.
How does the Lit Relay help?
- Opportunity to set Google authenticated accounts with a PKP, without needing to know about wallets. The relay takes care of the logic around wallet usage.
- Relay covers the gas to mint the PKP and put the encryption condition on-chain.
Sign in with Google
On the front end, use the Google React login component to call the handleLoggedInToGoogle method which takes in a Google credential response to kick off the PKP creation and association process.
<GoogleLogin
    onSuccess={handleLoggedInToGoogle}
    onError={() => {
      console.log("Login Failed");
    }}
    useOneTap
/>
Authenticate with Google and send request to relayer to mint a PKP
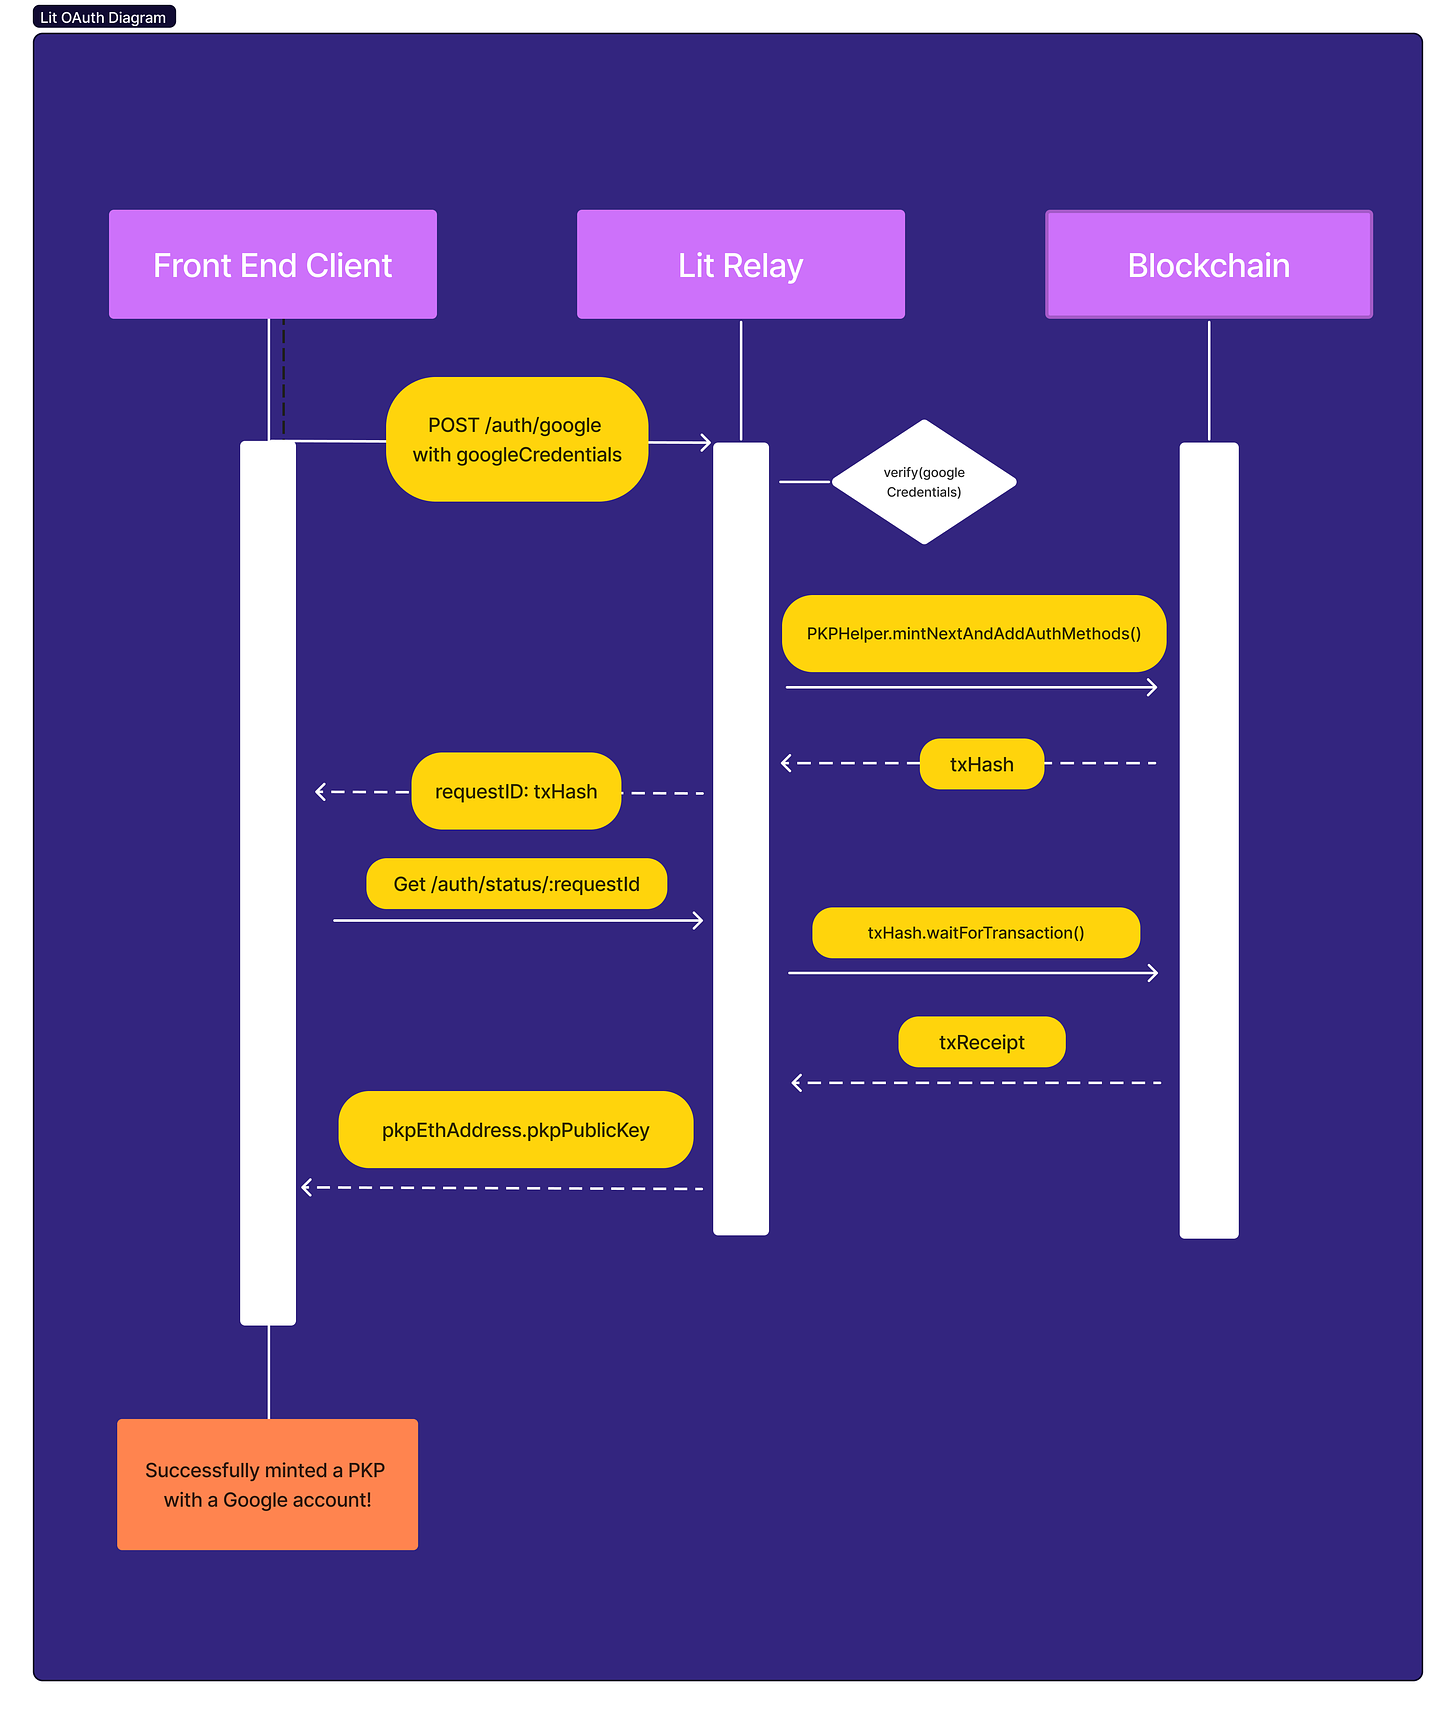
Once the user is logged in to Google the OAuth credentials need to be passed to the Lit Relayer set up to create the PKP and associate it with the currently authenticated Google account.
The Lit Relay receives the credential response from the authenticated client. From there the relayer will mint a PKP and set the OAuth credential received to be the PKP’s method of authorization. This links the Google credential with the PKP and allows the associated Google account the ability to sign and decrypt data with the PKP.
const handleLoggedInToGoogle = async (credentialResponse) => {
    setStatus("Logged in to Google");
    setGoogleCredentialResponse(credentialResponse);
    const requestId = await mintPkpWithRelayer(credentialResponse);
    await pollRequestUntilTerminalState(requestId);
  };
mintPKPWithRelayer
Within this function, the Google OAuth credential is passed to the relay server to initiate minting a PKP.
const mintPkpWithRelayer = async (credentialResponse) => {
    setStatus("Minting PKP with relayer...");

    const mintRes = await fetch(`${RELAY_API_URL}/auth/google`, {
      method: "POST",
      headers: {
        'Content-Type': 'application/json'
      },
      body: JSON.stringify({
        idToken: credentialResponse.credential
      }),
    });

    if (mintRes.status < 200 || mintRes.status >= 400) {
      setStatus("Uh oh, something's not quite right.");
      return null;
    } else {
      const resBody = await mintRes.json();
      setStatus("Successfully initiated minting PKP with relayer.")
      return resBody.requestId;
    }
  }
PollRequestUntilTerminalState
The client application is unaware of blockchain and waits to receive a response from the relay server. The client checks the poll endpoint with the requestId (transaction hash) obtained from the mintPKPWithRelayer function:
GET /auth/status/:requestId
The client calls the poll endpoint every 15 secs. The relay server waits for 8 transactions blocks to complete after the creation of the PKP before passing back a success response.
const pollRequestUntilTerminalState = async (requestId) => {
if (!requestId) {
return;
}
const maxPollCount = 20;
for (let i = 0; i < maxPollCount; i++) {
setStatus(`Waiting for auth completion (poll #${i+1})`);
const getAuthStatusRes = await fetch(`${RELAY_API_URL}/auth/status/${requestId}`);
if (getAuthStatusRes.status < 200 || getAuthStatusRes.status >= 400) {
setStatus("Uh oh, something's not quite right.");
return;
}
const resBody = await getAuthStatusRes.json();
if (resBody.error) {
// exit loop since error
return;
} else if (resBody.status === "Succeeded") {
// exit loop since success
setPkpEthAddress(resBody.pkpEthAddress);
setPkpPublicKey(resBody.pkpPublicKey);
return;
}
// otherwise, sleep then continue polling
await new Promise(r => setTimeout(r, 15000));
}
// at this point, polling ended and still no success, set failure status
setStatus(`Hmm this is taking longer than expected...`)
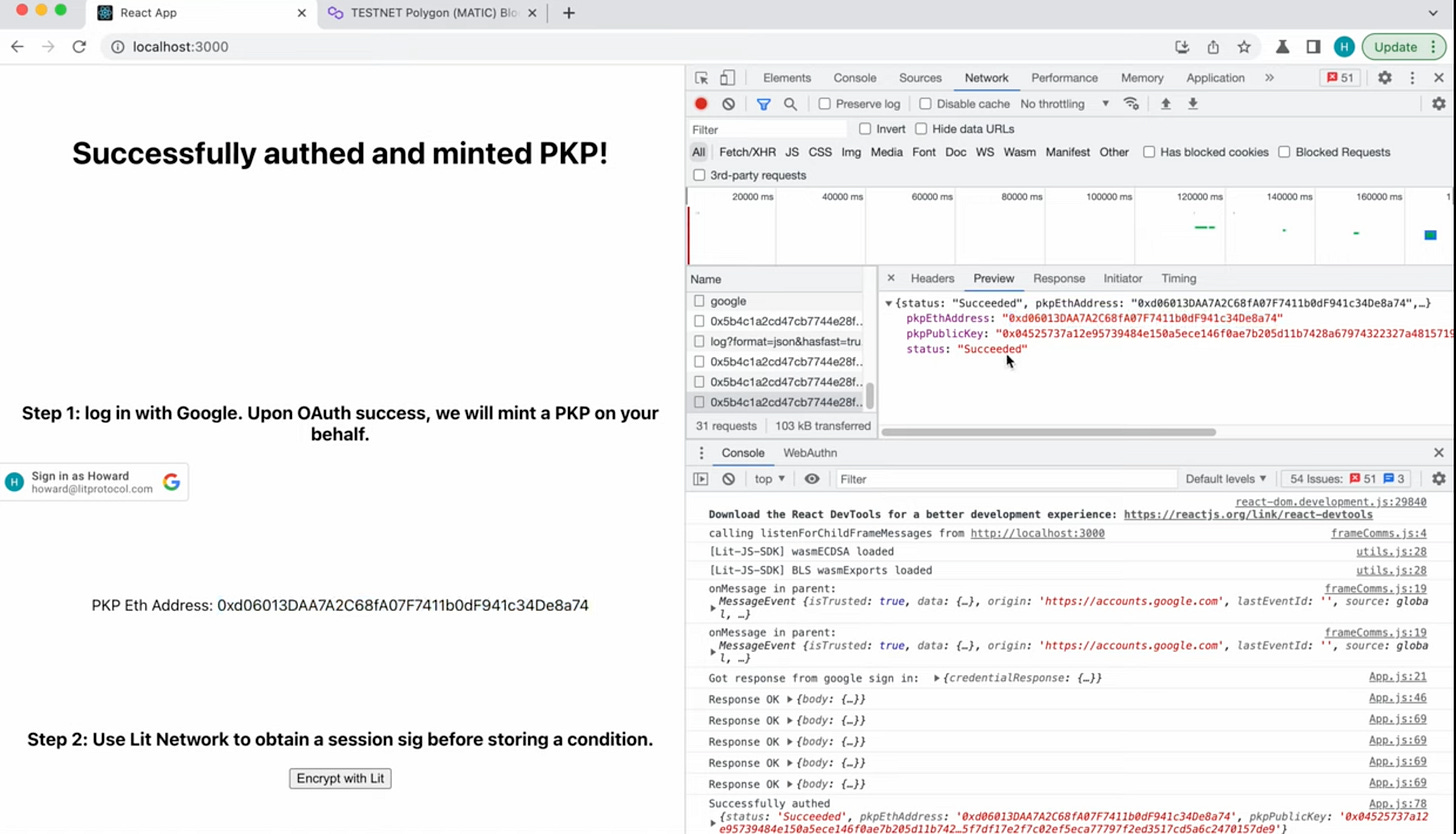
}Once the poll returns success, a PKP is minted! The the public key and ETH address are returned to the client.
What can the public key be used for?
Use the PKP to store an encryption condition to the Lit Nodes!
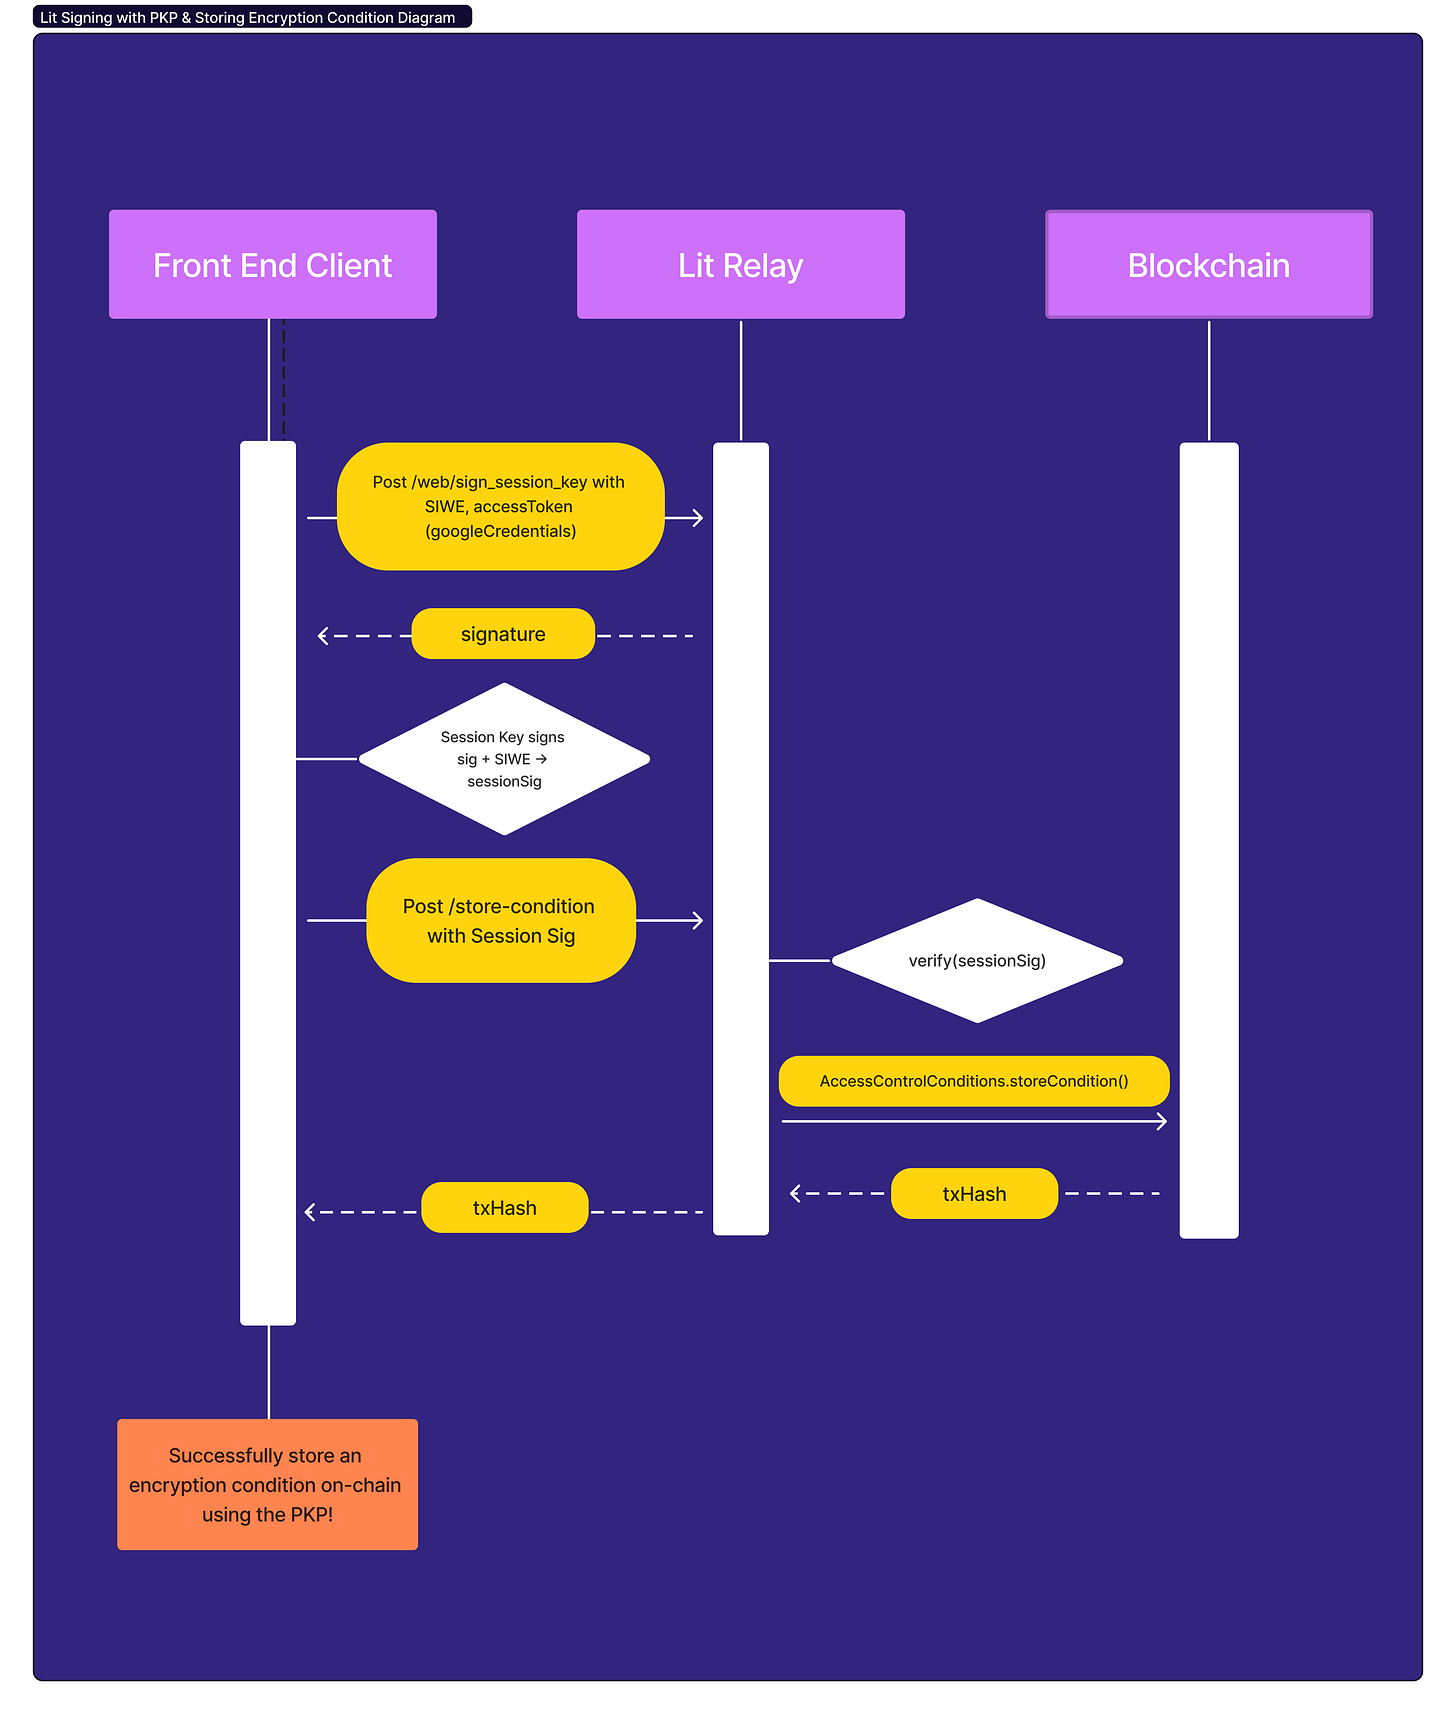
The public key for the PKP can be passed to the Lit Relay, where the relayer will save an encryption condition on-chain using the PKP as the signer.
With Lit Protocol, the user needs to prove ownership of their wallet or OAuth credential and this is typically done via a wallet signature, sometimes referred to as "auth sigs" in the Lit docs. However, to protect against replay attacks, to let users scope their wallet signatures to specific resources and to cover cases of proving ownership outside of wallets, we've implemented a system of session keys.
The user signs a SIWE message with their Google credential. This signature is stored in local storage. The session key-pair is used to sign all requests to the Lit Protocol API, and the user's credential is sent along with the request, attached as a "capability" to the session signature. Each node in the Lit Network receives a unique signature for each request, and can verify that the user owns the account that signed the capability.
First, obtain the session signature using the Google OAuth credential and the PKP public key.
A requisite is that you must have a connected LitNodeClient and pass that into the getSessionSigs function.
const sessionSigs = await litNodeClient.getSessionSigs({
    expiration: new Date(Date.now() + 1000 * 60 * 60 * 24).toISOString(), // 24 hours
    chain: "ethereum",
    resources: [`litEncryptionCondition://*`],
    sessionCapabilityObject: {
      def: ["litEncryptionCondition"]
    },
    switchChain: false,
    authNeededCallback, // function that calls signSessionKey to obtain an auth through the Google credential and PKP
});

console.log("sessionSigs before saving encryption key: ", sessionSigs);
The following will be triggered if auth is needed and will prompt the user to sign in.
const sessionSig = await litNodeClient.signSessionKey({
      sessionKey: uri,
      authMethods: [
        {
          authMethodType: 6,
          accessToken: googleCredentialResponse.credential,
        },
      ],
      pkpPublicKey,
      expiration,
      resources,
      chain,
    });
    return sessionSig;
  };
This encryption condition is set with the following access control conditions, which says only the owner of this PKP can decrypt.
var unifiedAccessControlConditions = [
    {
      conditionType: "evmBasic",
      contractAddress: "",
      standardContractType: "",
      chain: "mumbai",
      method: "",
      parameters: [":userAddress"],
      returnValueTest: {
        comparator: "=",
        value: pkpEthAddress,
      },
    },
  ];
We’ll also need the hashedEncryptedSymmetricKeyStr, hashedAccessControlConditionsStr, and securityHashStr to pass to the Lit Relay.
In order to obtain the hashedEncryptedSymmetricKeyStr, we call encryptWithBlsPubkey. A single BLS PKP is shared by all Serrano Testnet users and we are passing in that shared BLS PKP’s public key.
// key parameter - encrypt symmetric key then hash it
const encryptedSymmetricKey = LitJsSdk.encryptWithBlsPubkey({
  pubkey: litNodeClient.networkPubKey,
  data: symmetricKey,
});

const hashedEncryptedSymmetricKeyStr = await LitJsSdk.hashEncryptionKey({ encryptedSymmetricKey });
Hash the unified access control conditions using SHA-256 in a deterministic way.
const hashedAccessControlConditions = await LitJsSdk.hashUnifiedAccessControlConditions(unifiedAccessControlConditions);We need the security hash parameter to encrypt the symmetric key and concatenate it with the creator address (the PKP public key). The security hash string will be passed to the relay server to use.
// securityHash parameter - encrypt symmetric key, concat with creator address
const pkpEthAddressBytes = utils.arrayify(pkpEthAddress);
const securityHashPreimage = new Uint8Array([...encryptedSymmetricKey, ...pkpEthAddressBytes]);

const securityHashStr = await LitJsSdk.hashEncryptionKey({ encryptedSymmetricKey: securityHashPreimage });
Finally, call the relayer to write the encryption conditions to the chain - in this case to Polygon Mumbai.
POST /store-condition
const storeRes = await fetch(`${RELAY_API_URL}/store-condition`, {
	  method: "POST",
	  headers: {
	    'Content-Type': 'application/json'
	  },
	  body: JSON.stringify({
	    key: hashedEncryptedSymmetricKeyStr,
	    value: hashedAccessControlConditionsStr,
	    securityHash: securityHashStr,
	    chainId: "1",
	    permanent: false,
	    capabilityProtocolPrefix: "litEncryptionCondition",
	    // just choose any one session signature that is generated.
	    sessionSig: sessionSigs["https://serrano.litgateway.com:7370"],
	  }),
	});

	if (storeRes.status < 200 || storeRes.status >= 400) {
	  console.warn("Something wrong with the API call", await storeRes.json());
	  setStatus("Uh oh, something's not quite right");
	} else {
	  setStatus("Successfully stored encryption condition with relayer!");
	}
}
And we’ve successfully set a condition on-chain through the Lit Relay with authorization from a Google account!
Conclusion
Account abstraction is the future of web3 by providing users with a secure, transparent, and efficient means of managing their digital assets with flexibility surrounding key management and recovery. Using web2 authentication unlocks several paradigms for the decentralized web, providing frictionless onboarding experiences for new users and opening up opportunities for applications to be developed under the lens of convenience and customizability. Account abstraction is the bridge between the traditional web and the decentralized web. With the bridge we're paving the way for a more secure, accessible, and user-friendly experience for everyone.
Thinking about the future applications of owning a PKP through a Google account, what might that open up on a social platform like Orbis? You could use the underlying PKP associated with your Google account to create an account on Orbis. The Ceramic stream associated with your account could then be tied to and signed with the PKP, thus enabling a web2 way to create an account on a web3 decentralized social network!
- deb with support from Howard
Edited December 23, 2022
Inspired to build? Follow up with the Lit team and join the ecosystem.
💻 Developer Documentation: https://developer.litprotocol.com/
👾 Official Discord: https://litgateway.com/discord
🐙 GitHub: https://github.com/LIT-Protocol
🕊 Twitter: https://twitter.com/LitProtocol
🖥 Lit Website: https://litprotocol.com/