
Lit x Bundlr x Arweave: Private Data on the Decentralized Web
Learn how to build applications with private data on the decentralized Web.

Read this guide on how to encrypt data using Lit Protocol, upload it to Arweave using Bundlr, fetch the encrypted data, and decrypt!
Demo
Demo.
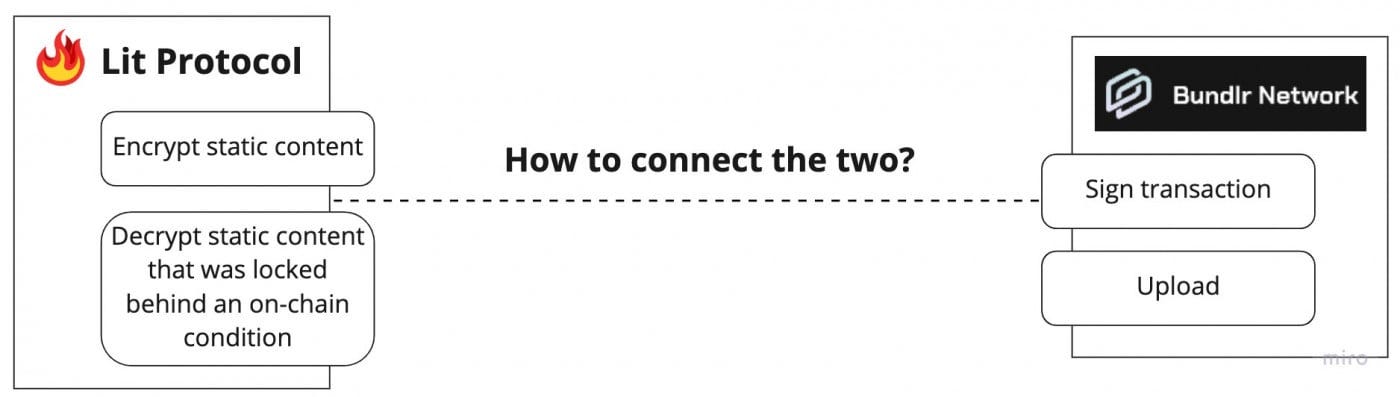
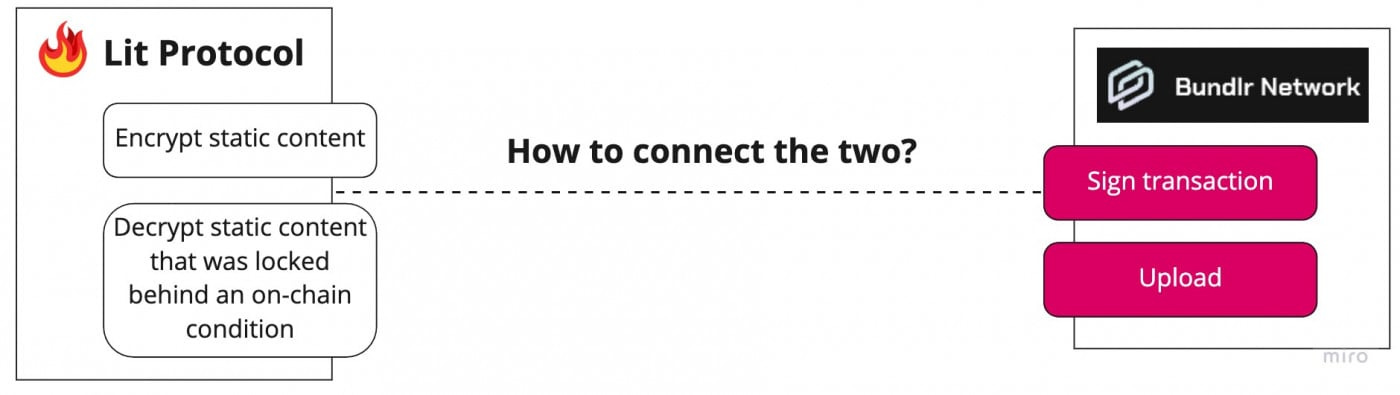
What can Lit Protocol do?
Lit Protocol is powered by the threshold cryptography, we can harness on-chain access control conditions to do 4 main things:
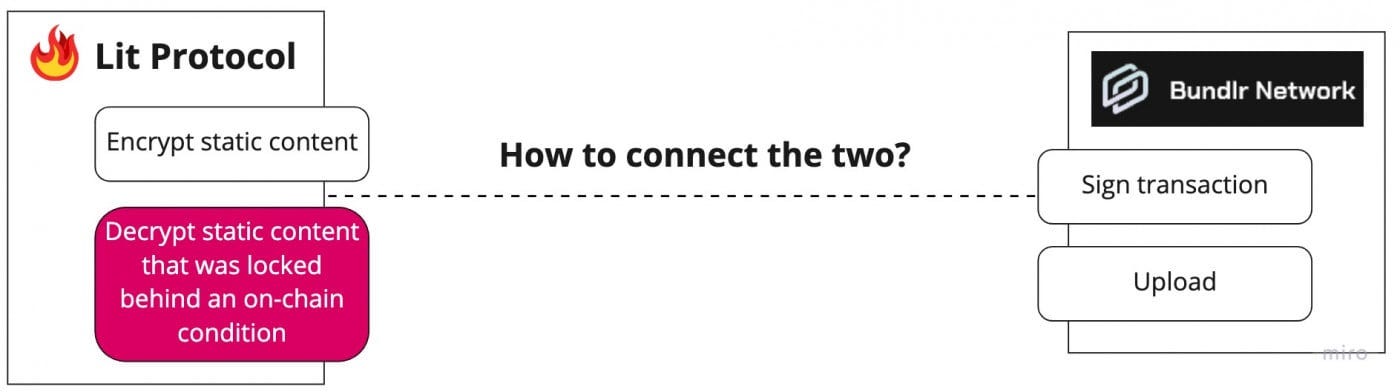
- Encrypt and lock static content
- Decrypt static content that was locked behind an on-chain condition
- Authorize network signatures that provide access to dynamic content
- Request a network signed JWT that provides access to dynamic content behind an on-chain condition

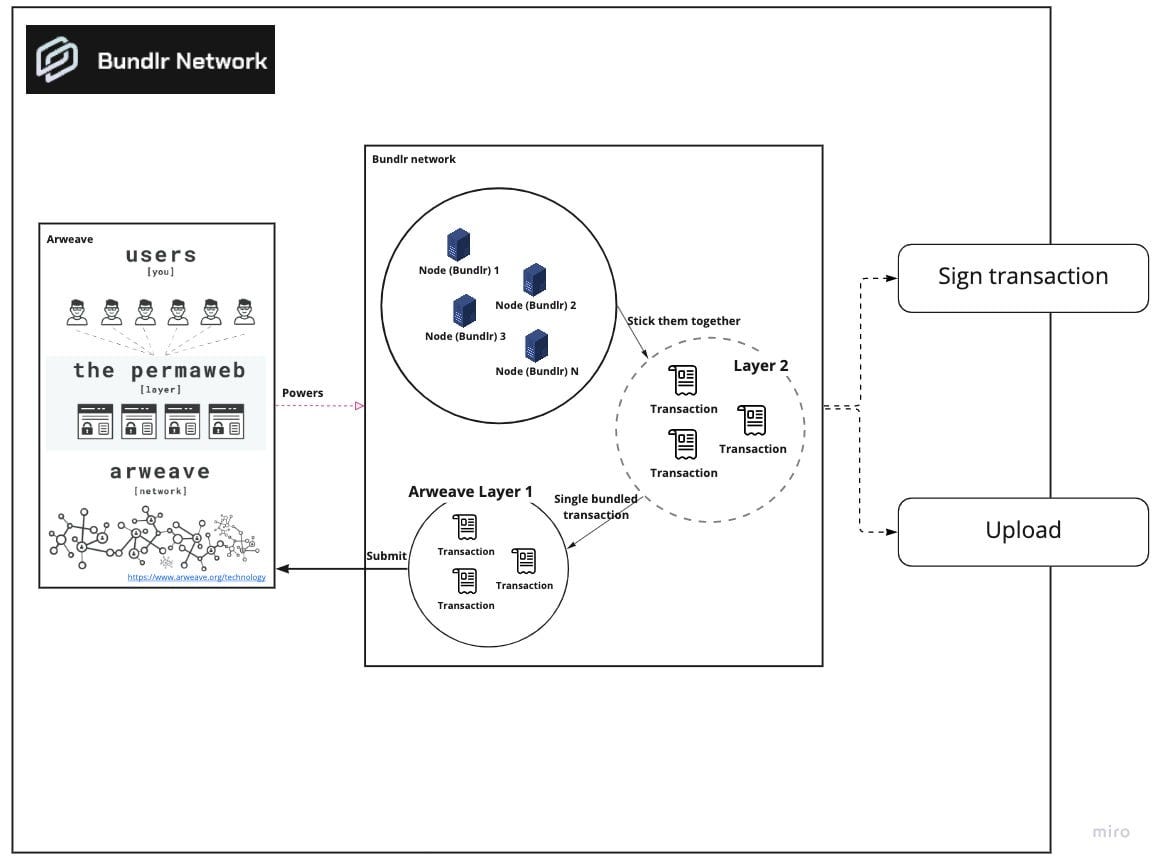
What can Bundlr do?
Bundlr is a decentralized storage scaling platform that increases the number of transactions conducted on Arweave, which is a decentralized storage network that enables you to store data permanently. Bundlr can do 2 main things:
- Collect multiple layer 2 transactions for 2 minutes, bundle them into a single Arweave layer 1 transaction, and submit the bundle onto Arweave.
- Allow users to sign with their native key when signing for a transaction, eg. Ethereum and Solana.
How do we utilize both technologies, and why?
Let’s say that you want to share private content with members of your DAO and they hold a given NFT, with Lit Protocol and Bundlr, you can encrypt and store an image that can be viewed by anyone that holds the NFT from the DAO’s collection.
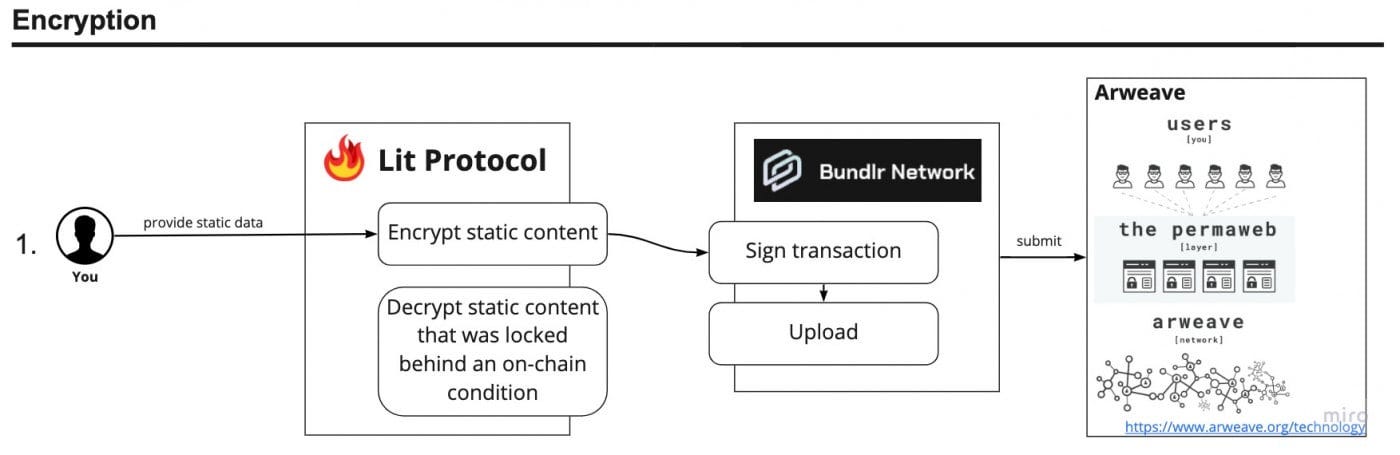
In this example, we will be encrypting an image (static content) with access control conditions using Lit Protocol, permanently store on Arweave using Bundlr APIs, downloading the encrypted image, and finally decrypting the image that was locked behind an on-chain condition.
There are a lot of APIs in both technologies, but in this example, we will only focus on the essential parts, encrypting the data and uploading to Arweave.
Step 1: Encrypt static content with Lit Protocol

First, we need to encrypt the static content, in our case, an image. In order to do that, we have to do the following steps:
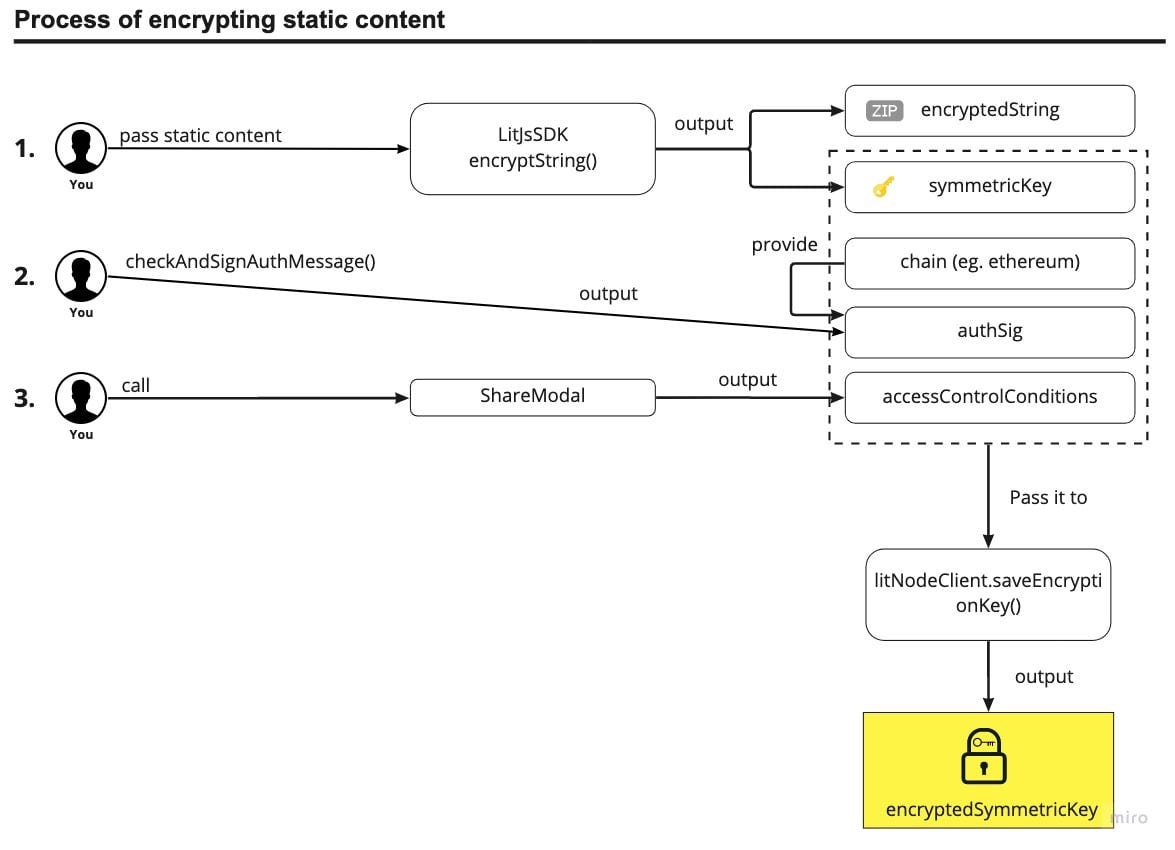
Step A:
Turn the static content into a String format (you can use the utilities we provide), then pass the staticContentInString to the LitJsSdk.encryptString() function. After execution, we will be given:
encryptedString:which is the encrypted image data;symmetricKey:the key to unlocking the encrypted image data.
Step B:
The symmetricKey is necessary to decrypt content and is meant to be private. Exposing the key to the public means anyone may be able to use it to decrypt private information. Luckily, with Lit Protocol, we can encrypt it and store it in the lit nodes, so that only the person who meets the access control conditions could retrieve the original symmetric key. In order to do this, we will need to pass in the following:
chain(String):ethereum(see other supported blockchains)authSig(Object): authentication signature, which can be collected from callingawait LitJsSdk.checkAndSignAuthMessage({chain})which will call up your web 3 wallets for you to sign the messageaccessControlConditions(Array): we can call up the Share Modal to obtain it
Step C:
Now that we have all 4 information, we can pass it to the litNodeClient.saveEncryptionKey() function. After execution, we will be given:
encryptedSymmetricKey: the symmetric key has been encrypted using the network public key, and it can only be retrieved if we have all 4 information
The code should look like:
const chain = 'ethereum';

const authSig = await LitJsSdk.checkAndSignAuthMessage({chain})

// Visit here to understand how to encrypt static content
// <https://developer.litprotocol.com/docs/LitTools/JSSDK/staticContent>
const { encryptedString, symmetricKey } = await LitJsSdk.encryptString(fileInString);

const encryptedSymmetricKey = await litNodeClient.saveEncryptionKey({
  accessControlConditions: accessControlConditions.accessControlConditions,
  symmetricKey,
  authSig,
  chain,
});

console.log("encryptedString:", encryptedString);
Step 2. Sign and upload using Bundlr
The data we are going to store on Arweave will not only be the encrypted image data itself, but we will also include the encryptedSymmetricKey and accessControlConditions (remember the 4 pieces of information we need to encrypt the original symmetric key? we will need the same 4 information to decrypt as well) and package it as a single JSON data, and convert it to a string.
const packagedData = JSON.stringify({
  encryptedData,
  encryptedSymmetricKey,
  accessControlConditions,
});
We will then need to create a Bundlr instance by providing:
- Your wallet (could be a private key or reading it from a wallet.json file)
- Change a currency
- …more info here
import Bundlr from '@bundlr-network/client';
const bundlr = new Bundlr("<http://node1.bundlr.network>", "currencyName", "privateKey");
Once the instance is setup, we can create a transaction for our packagedData:
// create a Bundlr Transaction
const tx = bundlr.createTransaction(packagedData)

const transactionId = tx.id;
Then we will sign it, and upload the transaction:
// sign the transaction
await tx.sign()

// upload the transaction
const result = await tx.upload();
You can view your transaction at: https://arweave.app/tx/{transaction_id}
Example: https://arweave.app/tx/mcXCIsUmwoKOy7Sk-WfCB1NfeT5gd1cJ78_wA4KGpNY
Step 3. Decrypt static content that was locked behind an on-chain condition
First, we will fetch the data from the transaction:
const data = await fetch('<https://arweave.net/>' + transactionId);
Then, we will read the data back as text and parse it to JSON format, as it was in string format when we uploaded.
const dataOnArweave = JSON.parse(await data.text());

// return
{
	'encryptedData': ...,
	'encryptedSymmetricKey': {'':'', ...},
	'accessControlConditions': [...],
}
Remember the 4 variables we need to get the symmetricKey? Two of them are already in the fetched data encryptedSymmetricKey and accessControlConditions So, all we need now is the authSig and the correct chain.
// The 4 information we need
const chain = 'ethereum';

const authSig = await LitJsSdk.checkAndSignAuthMessage({chain});

const accessControlConditions = dataOnArweave.accessControlConditions;

const encryptedSymmetricKey = LitJsSdk.uint8arrayToString(dataOnArweave.encryptedSymmetricKey, "base16");
We can now get the original symmetric key:
const symmetricKey = await litNodeClient.getEncryptionKey({
	accessControlConditions,
	toDecrypt: encryptedSymmetricKey,
	chain,
	authSig,
});
Now that we have the symmetric key, we can finally use it to decrypt the encrypted data.
const decryptString = await LitJsSdk.decryptString(
	dataURItoBlob(dataOnArweave.encryptedData),
	symmetricKey
);
Wrapping Up
That’s it! and that’s how we connect the two together. You’ve just learned to encrypt static data using Lit Protocol, upload it to Arweave using Bundlr, fetch the encrypted content, and decrypt it again using Lit!
More on:
- Lit Protocol.
- Bundlr Network.
- Calculating Arweave Fees.